

Complete Guide: Always-On Mac Server with MLX, oMLX & QwenPaw
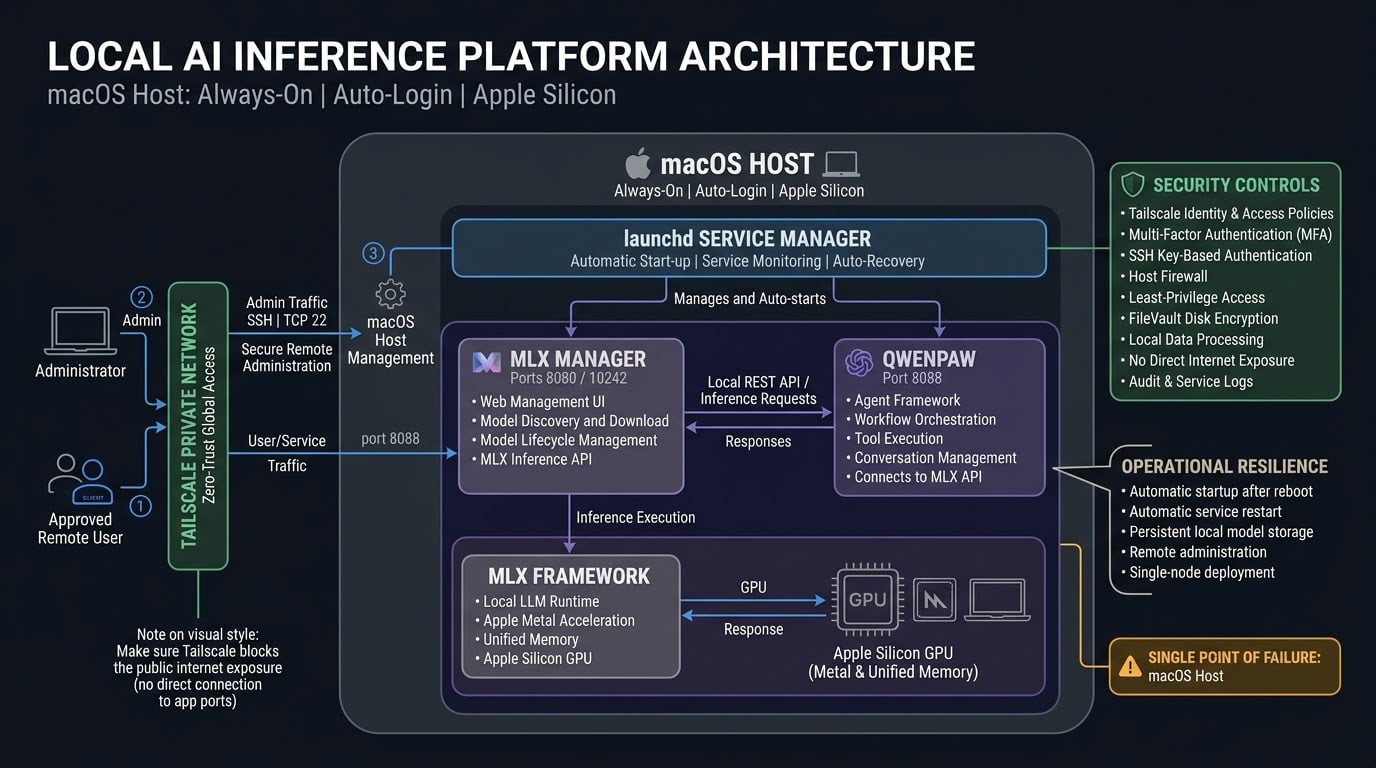
This guide transforms your Apple Silicon Mac into a persistent, always-on local AI server. By the end, you'll have MLX models running natively on the Metal GPU, a web UI for model management, and the QwenPaw agent framework — all surviving reboots and running headlessly with secure remote access via MagicDNS.
Tested Environment
Everything in this guide was verified on the following setup. If your versions are close, the commands should work unchanged.
| Component | Version | Notes |
|---|---|---|
| macOS | 15.x (Sequoia) or later | Required for oMLX |
| Chip | Apple Silicon (M1/M2/M3/M4/M5) | Required for MLX and oMLX |
| Homebrew | 4.x | Package manager for oMLX and Tailscale |
| uv | 0.8.x or later | Python version + package manager |
| Python (MLX venv) | 3.11.x | Managed by uv at ~/.mlx-venv |
| Python (QwenPaw) | 3.12.x | Bundled by QwenPaw's installer |
| MLX | 0.32.x | Apple's ML framework |
| mlx-lm | 0.28.x | LLM extensions for MLX |
| oMLX | latest via jundot/omlx |
Inference server + admin dashboard |
| QwenPaw | latest via agentscope.io |
Agent framework + web console |
| Tailscale | latest via --cask |
Mesh VPN + MagicDNS |
Note: Version numbers above reflect the state of the ecosystem when this guide was written. Run
brew --version,uv --version, or the relevant--versionflag after each install to confirm what you have.
Part 1: Prepare macOS for Headless Server Mode
These steps ensure your Mac never sleeps, is accessible remotely, and boots into a usable state without manual intervention.
1.1 Prevent System Sleep
Run this in Terminal to disable all sleep modes permanently:
sudo pmset -a disablesleep 1 sleep 0 disksleep 0 displaysleep 0 standby 0 autopoweroff 0 powernap 0
Expected output: You'll be prompted for your password. After entry, no confirmation message appears — that's normal.
Verify with:
pmset -g
Expected output:
System-wide power settings:
 SleepDisabled		1
Currently in use:
 standby              0
 Sleep On Power Button 1
 autorestartatconnect 0
 autorestart          0
 SleepServices        0
 powernap             0
 networkoversleep     0
 disksleep            0
 sleep                0 (sleep prevented by powerd, bluetoothd)
 ttyskeepawake        1
 displaysleep         0
 tcpkeepalive         1
 powermode            0
 womp                 1
Note: On macOS Ventura (13) and later,
pmsetreports the disablesleep setting asSleepDisabled 1instead ofdisablesleep 1. This is expected — it means the same thing.The annotation
(sleep prevented by powerd, bluetoothd)next tosleep 0is informational, not an error. It simply means that in addition to yourpmsetsettings, system daemons are also actively preventing sleep. Your server will stay awake.
1.2 Enable SSH (Remote Login)
On macOS Catalina (10.15) and later, the systemsetup command requires Full Disk Access to toggle Remote Login. Running it without that permission will fail with:
setremotelogin: Turning Remote Login on or off requires Full Disk Access privileges.
This is a macOS security feature (TCC), and sudo alone does not bypass it. Follow these steps to fix it permanently.
Step 1: Grant Full Disk Access to Terminal
- Open System Settings.
- Go to Privacy & Security → Full Disk Access.
- Click the + button.
- Navigate to Applications → Utilities and select Terminal.app (or your terminal of choice, e.g., iTerm).
- Toggle Terminal on in the list.
- Quit Terminal completely (
Cmd+Q) and reopen it. The permission only takes effect for new sessions.
Step 2: Enable Remote Login
Now run the command. It will succeed without the permission error:
sudo systemsetup -setremotelogin on
Expected output: setremotelogin: remote login is now on
Verify:
sudo systemsetup -getremotelogin
Expected output: Remote Login: On
Now you can SSH from another Mac: ssh username@your-mac-ip
1.3 Enable Auto-Login (Required for launchd Services at Boot)
launchd user agents only start after a user logs in. Without auto-login, your services won't run after a reboot.
- Open System Settings → Users & Groups
- Click Automatic Login → select your user account
- Enter your password when prompted
Note: FileVault must be OFF for auto-login to work. Go to System Settings → Privacy & Security → FileVault and turn it off if it's enabled. This is acceptable for a physically secure home server.
1.4 Optional: Menu Bar Server Mode Toggle
For quick control without terminal, install the mac-server-mode menu bar app:
git clone https://github.com/thairc-dev/mac-server-mode.git && cd mac-server-mode && ./build.sh && nohup ./mac-server-mode >/dev/null 2>&1 & ./install-launch-agent.sh
A ⚡ icon appears in your menu bar. Press Ctrl + Option + Cmd + S to toggle server mode (screen off, system awake).
Part 2: Install uv & Python 3.11
2.1 Install uv
uv is a fast, all-in-one Python package and version manager written in Rust. Install it via the official one-liner:
curl -LsSf https://astral.sh/uv/install.sh | sh && source ~/.zshrc && uv --version
Expected output: Installation progress bars, then uv 0.x.x.
2.2 Install Python 3.11 with uv
Install Python 3.11 as a uv-managed Python:
uv python install 3.11 && uv python list | grep 3.11
Expected output: Download progress, then the installed Python 3.11 version.
2.3 Create a Virtual Environment for MLX
Create a dedicated virtual environment, activate it, and verify the version in one go:
uv venv --python 3.11 ~/.mlx-venv && source ~/.mlx-venv/bin/activate && python --version && python -c "import platform; print(platform.processor())"
Expected output:
Python 3.11.x
arm
Critical: If you see
i386instead ofarm, you have a Rosetta (x86) Python. Reinstall Python 3.11 through uv and start over.
Part 3: Install MLX Framework
MLX is Apple's native machine learning framework for Apple Silicon.
With your virtual environment activated, install the framework and verify it:
source ~/.mlx-venv/bin/activate && uv pip install mlx mlx-lm && python -c "import mlx.core as mx; print(mx.__version__)"
Expected output: Successfully installed mlx-x.x.x mlx-lm-x.x.x ... followed by 0.32.x.
Note: The top-level
mlxmodule does not export__version__. If you trypython -c "import mlx; print(mlx.__version__)", you'll getAttributeError: module 'mlx' has no attribute '__version__'. The version attribute lives onmlx.core. Alternatively, you can read the version from package metadata:python -c "import importlib.metadata as md; print(md.version('mlx'))"
Part 4: Install oMLX (Web Dashboard + Background Service)
oMLX is an LLM inference server optimized for Apple Silicon, built on the MLX framework. It provides continuous batching, tiered KV caching (hot in-memory + cold SSD), and a web-based admin dashboard for managing models. It is actively maintained and ships as a Homebrew formula with native launchd service integration.
Note: oMLX is a community project maintained by
jundot. It is built directly on top of Apple's MLX framework (which is official).
Platform requirement: oMLX requires Apple Silicon (M1/M2/M3/M4) and macOS 15.0 (Sequoia) or later. Intel Macs and earlier macOS versions are rejected during installation.
4.1 Install Homebrew
If you don't already have Homebrew, install it and set up your PATH in one command:
/bin/bash -c "$(curl -fsSL https://raw.githubusercontent.com/Homebrew/install/HEAD/install.sh)" && echo 'eval "$(/opt/homebrew/bin/brew shellenv)"' >> ~/.zprofile && eval "$(/opt/homebrew/bin/brew shellenv)" && brew --version
Expected output: Installation progress messages, then Homebrew 4.x.x.
Note: If Homebrew is already installed, the installer will detect it and skip installation. You can safely run this command again.
4.2 Tap, Trust, and Install oMLX
Run all three steps in one command:
brew tap jundot/omlx https://github.com/jundot/omlx && brew trust jundot/omlx && brew install jundot/omlx/omlx
Expected output:
==> Tapping jundot/omlx
Cloning into '/opt/homebrew/Library/Taps/jundot/homebrew-omlx'...
Tapped 1 formula.
==> Successfully trusted tap jundot/omlx.
==> Installing omlx from jundot/omlx
/opt/homebrew/Cellar/omlx/x.x.x: ...
Why
brew trustis needed: Recent versions of Homebrew refuse to load formulas from third-party taps unless you explicitly trust them — a security feature to prevent arbitrary code execution from untrusted sources. If you skip this, you'll seeError: Refusing to load formula jundot/omlx/omlx from untrusted tap jundot/omlx.
4.3 Set the API Key
oMLX requires an API key for all requests to the /v1/* endpoints. You choose this key yourself — it's not generated. For this guide, we'll use:
omlx-night-thoughts
Important:
omlx-night-thoughtsis just an example. You can replace it with any string you want — as long as you use the same value in QwenPaw's config later in §5.2. If you change it here, change it there too.
Write the key into oMLX's settings file (creating the file if needed) and restart the service:
mkdir -p ~/.omlx && cat > ~/.omlx/settings.json << 'EOF'
{
  "auth": {
    "api_key": "omlx-night-thoughts"
  }
}
EOF
If you haven't started the service yet, this file is read automatically on first launch. If oMLX is already running, restart it to pick up the key:
brew services restart omlx
4.4 Start oMLX as an Always-On Background Service
Register oMLX with brew services, which installs a launchd agent that auto-starts on login and restarts on crash:
brew services start omlx && brew services list | grep omlx
Expected output:
==> Successfully started `omlx` (label: sh.brew.omlx)
omlx    started    yourname    ~/Library/LaunchAgents/sh.brew.omlx.plist
The Status should be started. Homebrew writes the launchd plist to ~/Library/LaunchAgents/sh.brew.omlx.plist automatically — no manual plist creation needed.
Useful brew services commands:
brew services stop omlx      # stop the service
brew services restart omlx   # restart the service
brew services info omlx      # show detailed status
4.5 Open the Admin Dashboard
oMLX binds to http://localhost:8000 by default. Open the admin dashboard in your browser:
http://localhost:8000/admin
From another device on your network, use your Mac's IP: http://your-mac-ip:8000/admin.
Note: The dashboard lives at
/admin, not/. Hitting the root URL returns a 404 by design.
4.6 Verify the API Key Works
Before moving on, confirm the key is accepted:
curl -s -H "Authorization: Bearer omlx-night-thoughts" http://localhost:8000/v1/models
Expected output: {"object":"list","data":[]} — an empty list is correct at this stage because no model is loaded yet. The important thing is that you don't see {"detail":"API key required"} or a 401.
If you do get a 401, the key wasn't saved. Re-run the cat > ~/.omlx/settings.json block from §4.3 and then brew services restart omlx.
4.7 Download & Deploy a Model
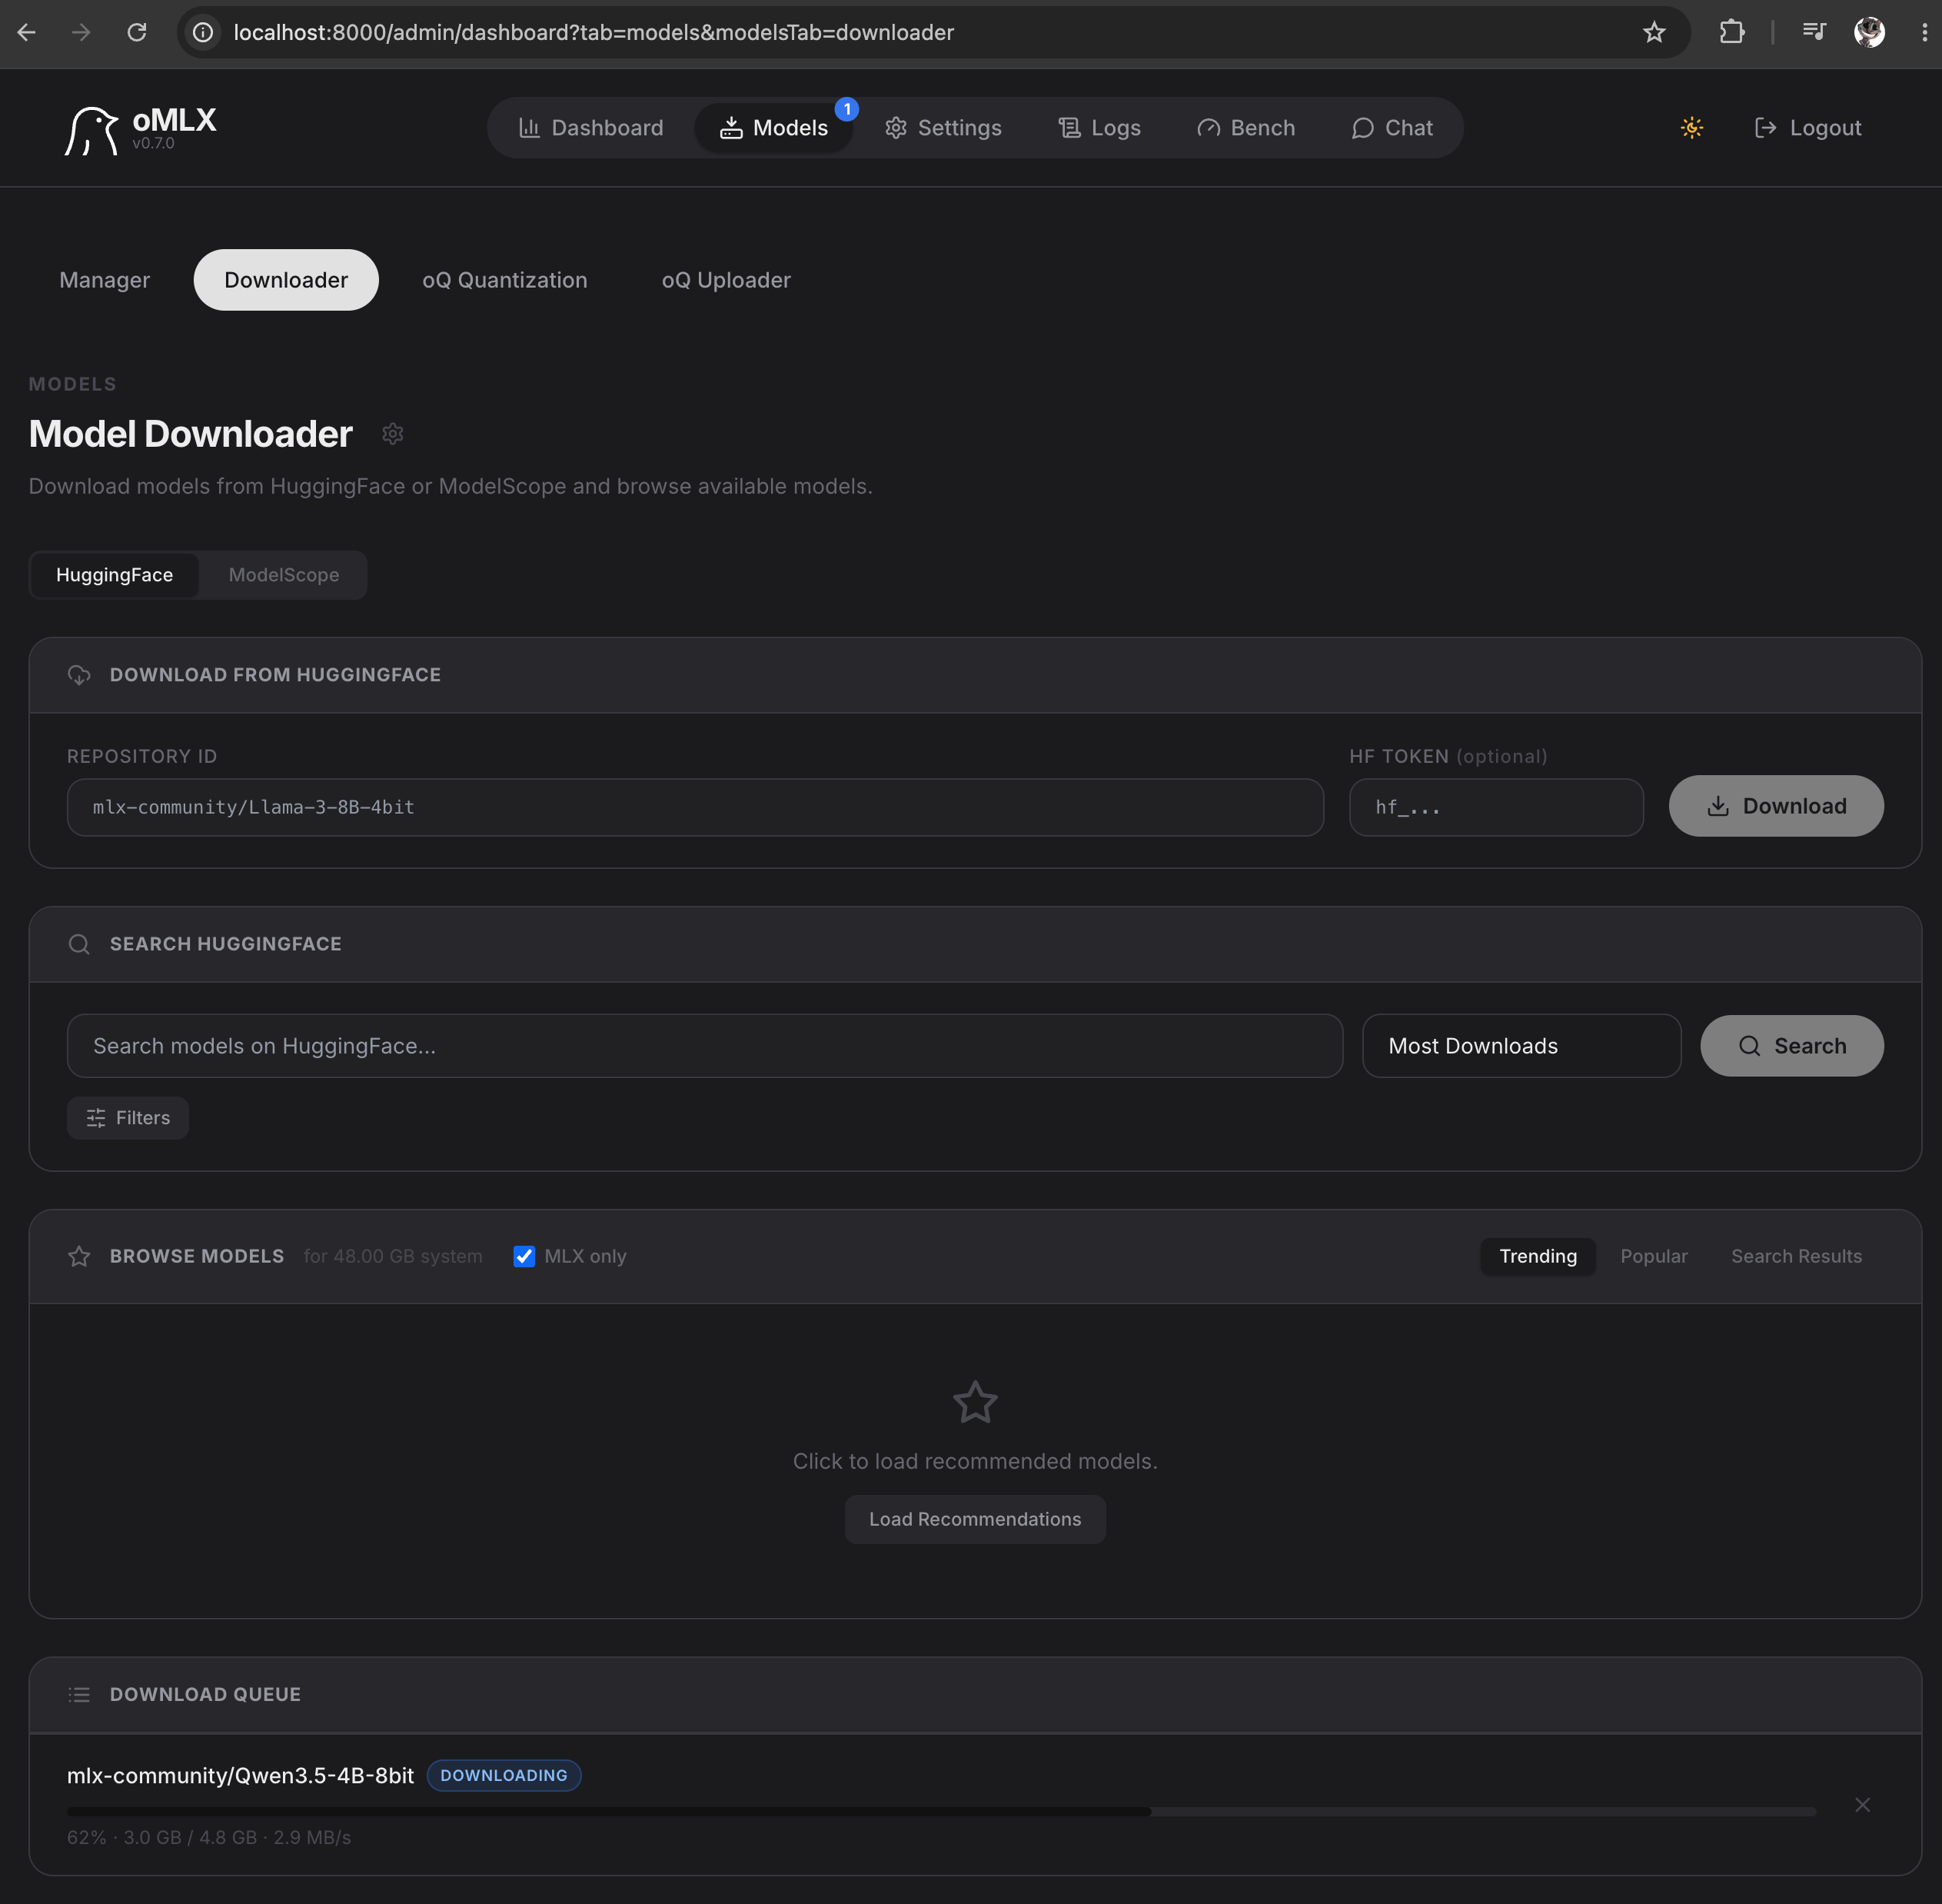
- In the admin dashboard (
http://localhost:8000/admin), go to the Models section - Search Hugging Face for MLX models (e.g.,
mlx-community/Qwen3.5-4B-8bit) - Click Download — watch the progress bar
- Configure per-model settings (sampling parameters, context length, etc.)
- Click Load to start serving
Verify the model is live:
curl -s -H "Authorization: Bearer omlx-night-thoughts" http://localhost:8000/v1/models
Expected output:
{"object":"list","data":[{"id":"mlx-community/Qwen3.5-4B-8bit","object":"model"}]}
Note: oMLX provides both OpenAI-compatible (
/v1/chat/completions) and Anthropic-compatible (/v1/messages) endpoints. It also supports/v1/embeddings,/v1/rerank, and/v1/responsesfor broader compatibility.
Part 5: Install QwenPaw (Agent Framework)
QwenPaw is a local-first AI agent framework that can connect to your oMLX-served models.
5.1 Install via One-Line Script
The installer writes a qwenpaw wrapper to ~/.qwenpaw/bin/ and adds it to your PATH via ~/.zshrc. Because your current shell session hasn't re-read that file yet, the command needs a source ~/.zshrc in between:
curl -fsSL https://qwenpaw.agentscope.io/install.sh | bash && source ~/.zshrc && qwenpaw init --defaults
Expected output:
[qwenpaw] QwenPaw installed successfully
[qwenpaw] Wrapper created at /Users/<you>/.qwenpaw/bin/qwenpaw
[qwenpaw] Updated /Users/<you>/.zshrc
✅ Configuration initialized at ~/.qwenpaw/config.json
✅ Default model backend configured
If you already ran the installer and got
command not found: qwenpaw: the install itself succeeded — you just need to reload your shell. Runsource ~/.zshrc && qwenpaw init --defaultsand continue.
This script installs QwenPaw into ~/.qwenpaw with a self-contained uv-managed Python environment. It automatically installs uv, creates a virtual environment, and downloads dependencies without requiring manual Python setup.
5.2 Configure QwenPaw to Use oMLX
Write the QwenPaw config in one command. Note that the api_key here must match the value you chose in §4.3 (omlx-night-thoughts in this guide):
cat > ~/.qwenpaw/config.json << 'EOF'
{
  "model": {
    "backend": "openai",
    "base_url": "http://localhost:8000/v1",
    "api_key": "omlx-night-thoughts",
    "model_name": "mlx-community/Qwen3.5-4B-8bit"
  }
}
EOF
Using a different key? If you chose a different value in §4.3, replace
omlx-night-thoughtsin theapi_keyfield above with that same value. The two must match — this is the single most common source of401 Unauthorizederrors.
Path note:
base_urlmust include the/v1suffix. QwenPaw's OpenAI client appends/models,/chat/completions, etc. afterbase_url, so a missing/v1sends requests to the wrong paths.
5.3 Start QwenPaw
source ~/.zshrc && qwenpaw app
Expected output:
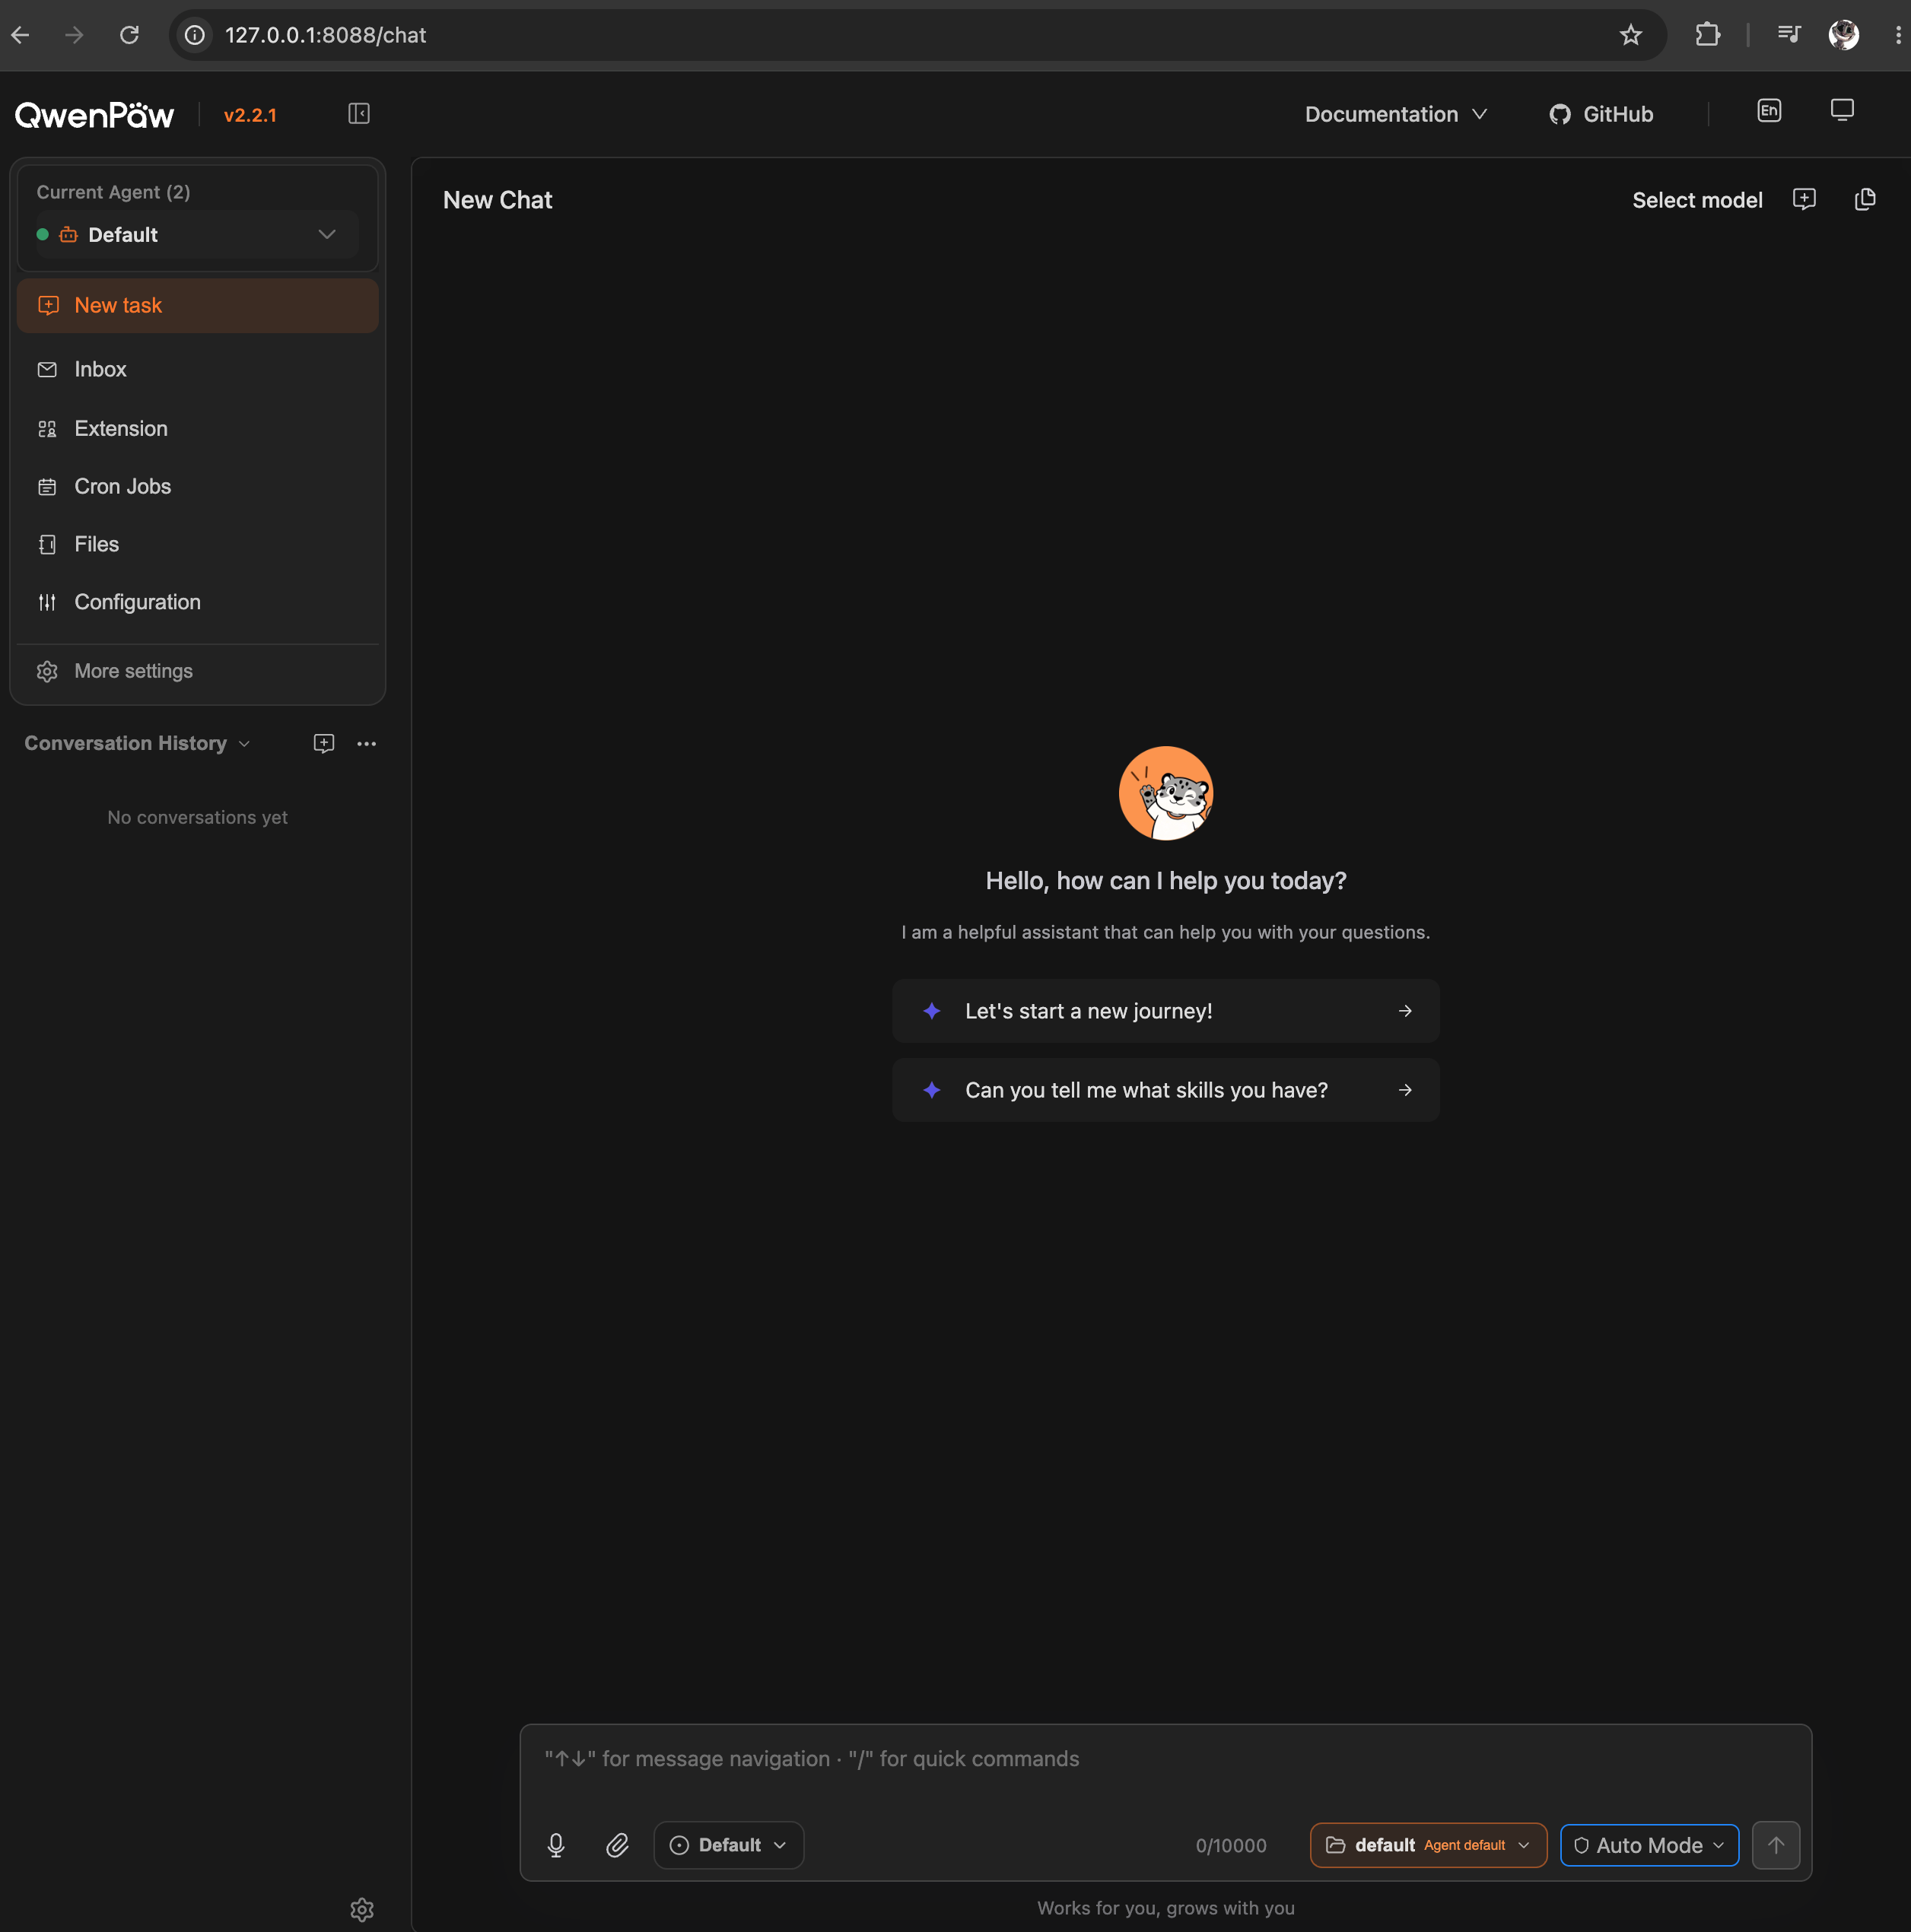
QwenPaw Console running at http://127.0.0.1:8088/
Open http://localhost:8088 to access the QwenPaw web console.
5.4 Make QwenPaw Persistent (launchd)
Create a launchd plist so QwenPaw starts automatically on login. This plist does three important things:
- Starts QwenPaw on login and keeps it running (
RunAtLoad+KeepAlive) - Routes launchd's stdout/stderr to
/dev/nullso no unrotated files grow forever - Pins QwenPaw's internal log rotation to 2 MiB × 2 backups via
EnvironmentVariablesso the log directory can never exceed ~6 MiB
The heredoc below is unquoted (<< EOF, not << 'EOF'), so the shell expands $HOME to your actual home directory when the file is written. Copy and paste the whole block in one shot:
mkdir -p ~/.qwenpaw/logs && cat > ~/Library/LaunchAgents/com.qwenpaw.app.plist << EOF
<?xml version="1.0" encoding="UTF-8"?>
<!DOCTYPE plist PUBLIC "-//Apple//DTD PLIST 1.0//EN" "http://www.apple.com/DTDs/PropertyList-1.0.dtd">
<plist version="1.0">
<dict>
  <key>Label</key>
  <string>com.qwenpaw.app</string>
  <key>ProgramArguments</key>
  <array>
    <string>$HOME/.qwenpaw/bin/qwenpaw</string>
    <string>app</string>
  </array>
  <key>RunAtLoad</key>
  <true/>
  <key>KeepAlive</key>
  <true/>
  <key>WorkingDirectory</key>
  <string>$HOME</string>
  <key>EnvironmentVariables</key>
  <dict>
    <key>QWENPAW_LOG_MAX_SIZE</key>
    <string>2MiB</string>
    <key>QWENPAW_LOG_MAX_BACKUPS</key>
    <string>2</string>
  </dict>
  <key>StandardOutPath</key>
  <string>/dev/null</string>
  <key>StandardErrorPath</key>
  <string>/dev/null</string>
</dict>
</plist>
EOF
Why these values?
launchdwrites toStandardOutPath/StandardErrorPathonce and never rotates them, so we route them to/dev/null. QwenPaw's ownRotatingFileHandlerwrites structured logs to~/.qwenpaw/qwenpaw.log, and the two env vars cap it at 2 MiB per file × 2 backups (≈ 6 MiB total). Worst-case log disk usage is bounded and known.
Load the launcher using launchctl bootstrap (the modern replacement for the legacy launchctl load, which fails with a generic Input/output error on Ventura and later):
launchctl bootout gui/$(id -u)/com.qwenpaw.app 2>/dev/null; launchctl bootstrap gui/$(id -u) ~/Library/LaunchAgents/com.qwenpaw.app.plist
Expected output: No output on success.
Confirm it's running:
launchctl list | grep qwenpaw
Expected output:
30406 0 com.qwenpaw.app
The first column is the PID (a number means it's running), the second is the last exit status (0 = clean), and the third is the label.
Useful launcher management commands:
launchctl list | grep qwenpaw                                             # check status
launchctl bootout gui/$(id -u)/com.qwenpaw.app                            # stop and unregister
launchctl bootstrap gui/$(id -u) ~/Library/LaunchAgents/com.qwenpaw.app.plist   # start and register
launchctl kickstart -k gui/$(id -u)/com.qwenpaw.app                       # restart in place
After editing the plist, you must
bootoutthenbootstrapfor changes to take effect — launchd caches the plist at load time.
Part 6: Verify Everything Survives a Reboot
Restart your Mac:
sudo reboot
After reboot, wait 30 seconds, then SSH in from another machine:
ssh your-username@your-mac-ip
Check all services in one command:
brew services list | grep omlx && launchctl list | grep qwenpaw && curl -s -H "Authorization: Bearer omlx-night-thoughts" http://localhost:8000/v1/models && curl -s -o /dev/null -w "QwenPaw HTTP %{http_code}\n" http://localhost:8088/
Expected output:
omlx    started    yourname    ~/Library/LaunchAgents/sh.brew.omlx.plist
30406	0	com.qwenpaw.app
{"object":"list","data":[...]}
QwenPaw HTTP 200
All three services should return healthy responses without any manual intervention.
Part 7: Remote Access from Anywhere with Tailscale & MagicDNS
Tailscale creates a secure mesh VPN between your devices, giving each one a stable private IP address that works from any network — even behind CGNAT or corporate firewalls, with no port forwarding required.
MagicDNS is Tailscale's built-in DNS feature that lets you reach your server by its machine name (e.g., my-mac) instead of remembering IP addresses. This section sets up MagicDNS as the primary access method for all your services.
7.1 Install Tailscale on Your Mac Server
brew install --cask tailscale
Expected output: tailscale-app was successfully installed!
Open the Tailscale app from your Applications folder or menu bar, and sign in with Google, GitHub, Microsoft, or email.
Once authenticated, the Tailscale icon appears in your menu bar and shows a green "Connected" status.
Note: The
--caskversion installs the GUI app but does not add thetailscaleCLI to your$PATH. See §7.1b below to enable it.
7.1b Enable the Tailscale CLI
The cask bundles the CLI inside the app binary. Do not symlink the app binary — it crashes with Fatal error: The current bundleIdentifier is unknown to the registry. Instead, add a shell alias:
echo 'alias tailscale="/Applications/Tailscale.app/Contents/MacOS/Tailscale"' >> ~/.zshrc && source ~/.zshrc && tailscale status
Expected output:
100.97.7.34    haithemslimis-mac-mini  haythemslimi@  macOS    -
100.88.189.0   night-thoughts         haythemslimi@  macOS    offline, last seen 2d ago
If you see your machine list, the CLI is working and you can proceed.
Tip: Your machine name (e.g.,
haithemslimis-mac-mini) may be long and awkward to type. You can rename it to something memorable likeai-serverin the admin console. The MagicDNS entry updates automatically.
7.2 Install Tailscale on Your Client Device
Install Tailscale on any device you'll use to connect — your laptop, phone, or tablet:
- macOS:
brew install --cask tailscaleor download from the Mac App Store - Windows: Download the installer from tailscale.com/download
- Linux:
curl -fsSL https://tailscale.com/install.sh | sh && sudo tailscale up - iOS/Android: Download from the App Store or Play Store
Critical: Sign in with the same account on every device. All devices must belong to the same "tailnet" (your private Tailscale network) to see each other.
7.3 Enable MagicDNS and HTTPS Certificates (One-Time Setup)
MagicDNS and HTTPS Certificates are required for secure, name-based access to your services.
- Go to the DNS page of the Tailscale admin console.
- Ensure MagicDNS is enabled. Tailnets created on or after October 20, 2022 have MagicDNS enabled by default.
- Under the HTTPS Certificates section, click Enable HTTPS. This allows Tailscale to automatically provision TLS certificates for your devices.
Important: Enabling HTTPS certificates publishes your machine names and tailnet DNS name on a public ledger (Certificate Transparency). If your machine names contain sensitive information, rename them before enabling HTTPS.
7.4 Find Your MagicDNS Name
Once MagicDNS is enabled, you can reach your Mac server by its machine name. There are two ways to find the name:
Method 1 — Menu Bar (Easiest): Click the Tailscale icon in your Mac's menu bar. Your machine name appears under "This Device".
Method 2 — Terminal:
tailscale status
Expected output:
100.101.102.10   my-mac        your-email@example.com  macOS  -
100.101.102.11   my-laptop     your-email@example.com  macOS  -
Your MagicDNS name is the second column (e.g., my-mac).
Method 3 — Admin Console: Go to console.tailscale.com/admin/machines, find your Mac in the list, and copy the machine name.
Tip: You can rename your device to something memorable (like
ai-server) by editing the machine name in the admin console. The MagicDNS entry will update automatically.
7.5 Verify MagicDNS Resolution
From your client device (e.g., your laptop), test that MagicDNS resolves the machine name:
ping my-mac
Expected output:
PING my-mac (100.101.102.10): 56 data bytes
64 bytes from 100.101.102.10: icmp_seq=0 ttl=64 time=12.3 ms
If you get a response, MagicDNS is working. Press Ctrl+C to stop.
Note: Some CLI tools on macOS like
hostornslookupbypass system DNS resolution and will not work with MagicDNS. Usepingorcurlinstead.
7.6 SSH into Your Mac Server Using MagicDNS
Once MagicDNS is working, SSH becomes much simpler — no more remembering IP addresses:
ssh your-username@my-mac
Expected output:
The authenticity of host 'my-mac (100.101.102.10)' can't be established.
ED25519 key fingerprint is SHA256:...
Are you sure you want to continue connecting (yes/no)?
Type yes and enter your Mac's login password. You are now remotely connected to your always-on AI server from any network in the world, using a human-readable name.
Tip: For shared devices, you must use the full domain name:
ssh your-username@my-mac.your-tailnet.ts.net.
7.7 Optional — Enable Tailscale SSH (Passwordless)
Tailscale SSH lets you authenticate using your Tailscale identity instead of your macOS password. This is useful for automation and scripting.
On your Mac server, run:
tailscale set --ssh && tailscale status --json | grep -i ssh
Expected output: "ssh": true
Now when you SSH from another Tailscale device, Tailscale handles authentication automatically:
ssh your-username@my-mac
Important: Tailscale SSH requires you to configure an access control policy. Go to console.tailscale.com/admin/acls and add:
"ssh": [
  {
    "action": "accept",
    "src": ["your-tailscale-username"],
    "dst": ["autogroup:self"],
    "users": ["autogroup:nonroot"]
  }
]
This allows devices you own to SSH into each other without a password.
7.8 Secure Remote Access to Web UIs with HTTPS via MagicDNS
Your oMLX admin dashboard (port 8000) and QwenPaw (port 8088) web interfaces can be accessed securely over HTTPS using Tailscale Serve. This provides a valid TLS certificate automatically and encrypts all traffic.
Run these commands on your Mac server:
tailscale serve --bg --https=443 http://localhost:8000 && tailscale serve --bg --https=443 http://localhost:8088 && tailscale serve status
Expected output:
https://my-mac.your-tailnet.ts.net
|-- / proxy http://localhost:8000
|-- / proxy http://localhost:8088
Open the HTTPS URL in your browser from any device on your tailnet:
https://my-mac.your-tailnet.ts.net (for oMLX admin dashboard)
https://my-mac.your-tailnet.ts.net (for QwenPaw)
Your connection will be fully encrypted, and the browser will show a valid HTTPS certificate (padlock icon). No port forwarding, no firewall changes, and no certificate warnings.
Note: If you need to serve on a different port (e.g., 8443), use
--https=8443instead. The MagicDNS URL will include the port number.
7.9 Optional — Public Access with Tailscale Funnel
If you need to share your services with someone outside your tailnet (e.g., a client reviewing a prototype), Tailscale Funnel exposes a local port to the public internet over a stable HTTPS URL — without port forwarding, DNS records, or a public IP address.
Enabling Funnel:
- Go to the DNS page of the admin console.
- Ensure MagicDNS and HTTPS Certificates are enabled (both are required for Funnel).
- Under the Funnel section, turn on Funnel. You need to be an Owner, Admin, or Network admin.
Exposing a service publicly:
tailscale funnel 8000
Expected output:
Available on the internet:
https://my-mac.your-tailnet.ts.net/
|-- proxy http://127.0.0.1:8000
Warning: Funnel exposes your service to the public internet. Anyone with the URL can access it. Do not use Funnel for services containing sensitive data. Always enable password authentication for any service exposed via Funnel. Since oMLX already requires your
omlx-night-thoughtsAPI key, this is protected — but review any service you expose.
To stop public access:
tailscale funnel --terminate-on 8000
7.10 Verify Tailscale Survives Reboot
Tailscale runs as a system extension and automatically reconnects on reboot. After restarting your Mac, verify from your client device:
ping my-mac
If the ping succeeds, Tailscale and MagicDNS are active and your server is reachable by name.
Troubleshooting Quick Reference
| Symptom | Fix |
|---|---|
systemsetup: Turning Remote Login on or off requires Full Disk Access privileges |
Grant Terminal Full Disk Access in System Settings → Privacy & Security → Full Disk Access, then quit and reopen Terminal |
pmset -g shows SleepDisabled 1 instead of disablesleep 1 |
Normal on macOS Ventura+. Same setting, different label |
sleep 0 (sleep prevented by powerd, bluetoothd) |
Informational, not an error. Sleep is disabled as intended |
brew: command not found |
Run eval "$(/opt/homebrew/bin/brew shellenv)" or add it to ~/.zprofile as shown in §4.1 |
Error: Refusing to load formula ... from untrusted tap |
Run brew trust jundot/omlx, then retry brew install jundot/omlx/omlx |
| oMLX install rejected on Intel Mac or macOS 14 | oMLX requires Apple Silicon (M1/M2/M3/M4) and macOS 15.0 (Sequoia) or later |
AttributeError: module 'mlx' has no attribute '__version__' |
Expected — version lives on mlx.core. Use python -c "import mlx.core as mx; print(mx.__version__)" |
| oMLX isn't running after reboot | Run brew services list — status should be started |
Admin dashboard shows 404 at localhost:8000 |
The correct path is /admin, not /. Use http://localhost:8000/admin |
401 Unauthorized from oMLX |
The api_key in QwenPaw's config doesn't match the key in ~/.omlx/settings.json. Both must be exactly the same string |
{"detail":"API key required"} from curl |
You forgot the Authorization: Bearer <key> header |
{"object":"list","data":[]} from /v1/models |
This is correct — no model is loaded yet. Download and load one via the admin dashboard |
| Forgot the oMLX API key | Read it back with cat ~/.omlx/settings.json | grep api_key |
command not found: qwenpaw after install |
Run source ~/.zshrc (or open a new terminal) to reload your PATH, then retry |
launchctl load fails with Load failed: 5: Input/output error |
Use launchctl bootstrap gui/$(id -u) ~/Library/LaunchAgents/com.qwenpaw.app.plist instead of the legacy load command |
tailscale: command not found after cask install |
Add the alias: echo 'alias tailscale="/Applications/Tailscale.app/Contents/MacOS/Tailscale"' >> ~/.zshrc && source ~/.zshrc |
Fatal error: The current bundleIdentifier is unknown to the registry |
You symlinked the Tailscale app binary. Remove the symlink and use the shell alias instead |
| Services don't start after reboot | Verify auto-login is enabled; check FileVault is OFF |
omlx not found |
Run eval "$(/opt/homebrew/bin/brew shellenv)" and retry |
| QwenPaw can't reach oMLX | Confirm oMLX is running: curl -H "Authorization: Bearer omlx-night-thoughts" http://localhost:8000/v1/models. Also ensure base_url in QwenPaw config includes /v1 |
| Out of memory errors | Use smaller quantized models (4-bit); reduce context window per-model in oMLX admin settings |
| Port conflicts | Change oMLX port via OMLX_PORT env var or omlx serve --port <port> |
| MagicDNS name doesn't resolve | Verify MagicDNS is enabled in the Tailscale admin console under DNS settings |
ts.net URL doesn't resolve |
MagicDNS may be off for that resolver; enable it, or use curl --resolve |
| SSH over Tailscale times out | Verify Remote Login is enabled; check Tailscale SSH policy in admin console |
| HTTPS URL gives certificate error | Verify HTTPS Certificates are enabled in the Tailscale admin console |
| Tailscale Serve not working | Run tailscale serve status to check active configurations |
| Funnel URL not accessible | Verify Funnel is enabled in the admin console; check your ACL policy allows Funnel |